Thursday, February 27, 2014

Friction

Friction:


Previous lesson:


Gravity
Center of Gravity

Things you'll need for this lesson:

(Optional) Materials of different roughness (jeans, silk, wood, & sandpaper of different grit). The pinewood derby kit with wheels, nails, and body.


Lesson

Sir Isaac Newton lived in a later time than Galileo, but he is credited with really isolating the theories of motion.

His first law of motion is something that is in motion will continue to do so unless affected by an outside force. In outer-space, there is no air. For the most part, there is absolutely nothing in space. So there is nothing to slow down a rocket ship.  So in outer-space, a rocket ship could blast off then turn off its engines and then travel forever in one direction at the same speed; that is, until it came close enough to something else to be affected by it, like gravity or friction.

What is friction?


Friction is a force. It is the force of resistance between two different materials sliding against each other. Let's say you want to go down a slide really fast.

You climb to the top of a giant playground slide that has four slides of exactly the same height and shape and steepness. One is made of cement and one is made of shiny steel.

Which one is going to be the fastest to slide down?

The steel one, of course.

And you have a choice of trousers that you can slide on.  You can wear your trousers made of sticky tape or jean? Which one would you wear to go faster? Jeans.

Certain materials slide easier.  They have lower "friction quotient". This friction quotient is a number that measures how easily things slide against another.

How does friction affect the Pinewood Derby car?

There are several things that can affect friction, but the biggest thing that causes friction in a Pinewood Derby is a material's roughness as it rubs against something else.

The car doesn't just run down the track, it is a bunch of different thing rubbing against each other. It is the wheels rolling on the track, the inside of the wheels rubbing against the axle pins, the wheels bouncing back and forth on the axle and with the outer wheel hub rubbing against the inside of the axle hub and the inside wheel cone rubbing against the car body, and the car pushing/rubbing against the air as it falls down the track.

So your Cub Scout is going to polish all of the surfaces that are places where things rub - the axle shaft/inside, wheel inside/outer-hub/tread/inner-hub, and the outer skin of the car (where air rubs against it).

Roughness = friction
It is easy to understand why a steel slides have less friction than a cement slide because the difference in roughness is obvious.  In the case of Pinewood Derby, every scout is given identical wood, nails, and wheels. So it is not a matter of having materials that have less friction, but how you treat the materials to have less friction.  

Here is an example, the axle right out of the box has a ring shanks (those line ridges in the middle of the shaft) and burr (that webbing of metal in between the head and the shaft. The ring shanks are purposely put on there so a nail won't come out once nail it.  Both obviously have to be removed (and I will talk about that more later). Scratches, dents, and bumps that you can see are big sources of friction.


Look at the side of the nail besides the ring shanks.  It looks smooth, right?

Yes, it is smooth, but it can be made smoother.  If you looked at the nail shaft under a microscope, you would see a bumpy surface with micro-cracks, small holes, and tiny bumps. These cracks, bumps, and holes slow your car down too.


And the same thing happens with wood. Your block of wood looks like it has straight edges. But under a microscope, we see it has rough edges, each ridge acting like a rough surface to rub against you wheel hubs or catching the wind. These need to be sanded down.


Other forms of friction

And the car just doesn't glide down the track. It jiggles, crashes side to side, and rolls over really small unseen stuff in the track. This bumping about causes even more friction as downward energy motion is lost into other motions - side to side, up and down (with the down like pressing harder on the brakes).  The general rule is, the quieter the car, the less friction. 

What friction matters the most on a Pinewood Derby car?

In this order, this is what you should spend the most time on in terms of polishing.

Axles sides
Vibrational friction
Axle hubs
Inner wheel
Wood side
Air
Wheel surface

How do we reduce friction

We cannot eliminate all friction, but we try to remove as much friction as possible.  We will sand different parts of our car many different times, each time with a sandpaper with smaller and smaller rocks on it until the rocks are so small that we can't see them.


Monday, February 17, 2014

Risk

There is one element that nobody really talks about when designing and building a real pinewood derby car: risk.

You can design a great car. Your son can try to hammer in the axles straight. Your son is going to do his best in making the car. But things go wrong. They go wrong when you do it. They go wrong when he does it.

Tips:
1. Do yourself this favor.  If nothing else - buy 2 or 3 sets of the car kit.  A bent axle, a miscut body, a broken wheel, a mismeasured line will ruin this for your son. Do not let having another $6 block of wood, four other steel nails, and some cheap plastic wheel be the difference between disaster and good times.

2. Drilling axle holes versus axle grooves. And there are some issus with risk in design. The most imminent one is drilling holes farther back and higher up. In theory, it will make your car faster.  In practice, you are introducing a lot of new risk into the design. Without a drill press or a specialty drill jig attachment, you have no chance of drilling new holes straight enough to make the car go straight (and win). It is easier to cut a straight line with a coping saw for an axle groove. So just be prepared to make mistakes.

One year, we drilled holes. They weren't straight. So we used the other side of the block. They weren't straight either. We cut axle grooves on one side. One wasn't straight, so we used the other side.  I decided to only make one cut and keep the existing axle groove.  I got that line straight. And the axle groove allowed me to move the axles up and down, which was an added bonus. So, yes, axle grooves are not theoretically as good a drilled holes, but in practice, they are a lot, lot easier to work with.

3. One block, two bodies. You should be able to make your rough cut, one quarter in on the thin side angling up to one inch in the back. You cut that, you have two car bodies to work with. You mess up on one, you have another to work on.

4. Get a coping saw that is more than 3.5 inches in clearance in the back.  Otherwise, you will have difficulty cutting the block in half.

5. Safety first. Get goggles that fit you and your son.  Have an eye wash station ready to go.  There is sharp things, metal burrs, sawdust, and other things you don't want in your eyes. Have a pair of light gloves for you.  Your son is not going to be steady with the coping saw and Dremel.  It WILL get away from him now and again.  It is better that the thin gloves take the brunt of it rather than your skin. And your son won't cry because  he hurt you on accident.

6. Do NOT wait until the last minute to start.  I have said this before. You can do the car in one day. Your son will need months.  Things happen. Homework. Holidays. Birthday parties. Pinewood gets deprioritized and don't expect it to be a priority. Just allow for lots of time.

7. If the rules say 3/4 inch clearance, add on an extra 1/16 of an inch. The biggest tears come from kids who bottom out on a track and can't finish a race. And I have yet to see it, but disqualification has to be horrible. Let's try to win, but let's not flirt with disaster.

8.  Be prepared for race day adjustments/disasters. I will have a post on this later.


Rotational Inertia

There is something rarely talked about.

Rotational inertia.  Take a ball and quickly twist/rotate it in your hand. Now take a ruler and rotate/flap it back and forth. The ball's mass is compact, so rotates easily.  The ruler's is long and has its mass distributed along its entire length. The end of the rulers are far away from where you are rotating your wrist, so it takes more effort to stop and reverse direction.  This is rotational inertia.

The same thing happens in your pinewood derby car.  Most tracks slide down and then quickly curve at the bottom.  Those that have their weight distributed along the car nose to back will have more inertia, taking more effort to go into the curve. Those with weights that are compact aligned will navigate the curve with less rotational inertia.

If you want your son to win, he will not be using zinc weights. But if he is, drill your holes close together and go into the side of the car, not the back. I encourage lead or tungsten weights, which are already very dense by putting them together in the weight pocket.  They will be naturally aligned along the back in tight rows. Rotational inertail issue minimized.

Aerodynamics

Aerodynamics

Previous lessons: Center of gravity

This section is divided into two sections. One for parents and one for the kids.

Parents:
Drag is the friction caused by the air the Pinewood Derby cars travel through.  It is the following calculation:


{\mathbf  {F}}_{d}={1 \over 2}\rho AC_{d}v^{2}=bv^{2}

F(d) is the air drag in newtons (how much this slows down your car measured in kg m/second(squared)
rho (that little p) is the density of air (1.1644 kg/cubic meter, give or take depending on temperature and humidity)
v is the relative velocity of the object (the cars on our track travelled at about 4.0 meters/second)
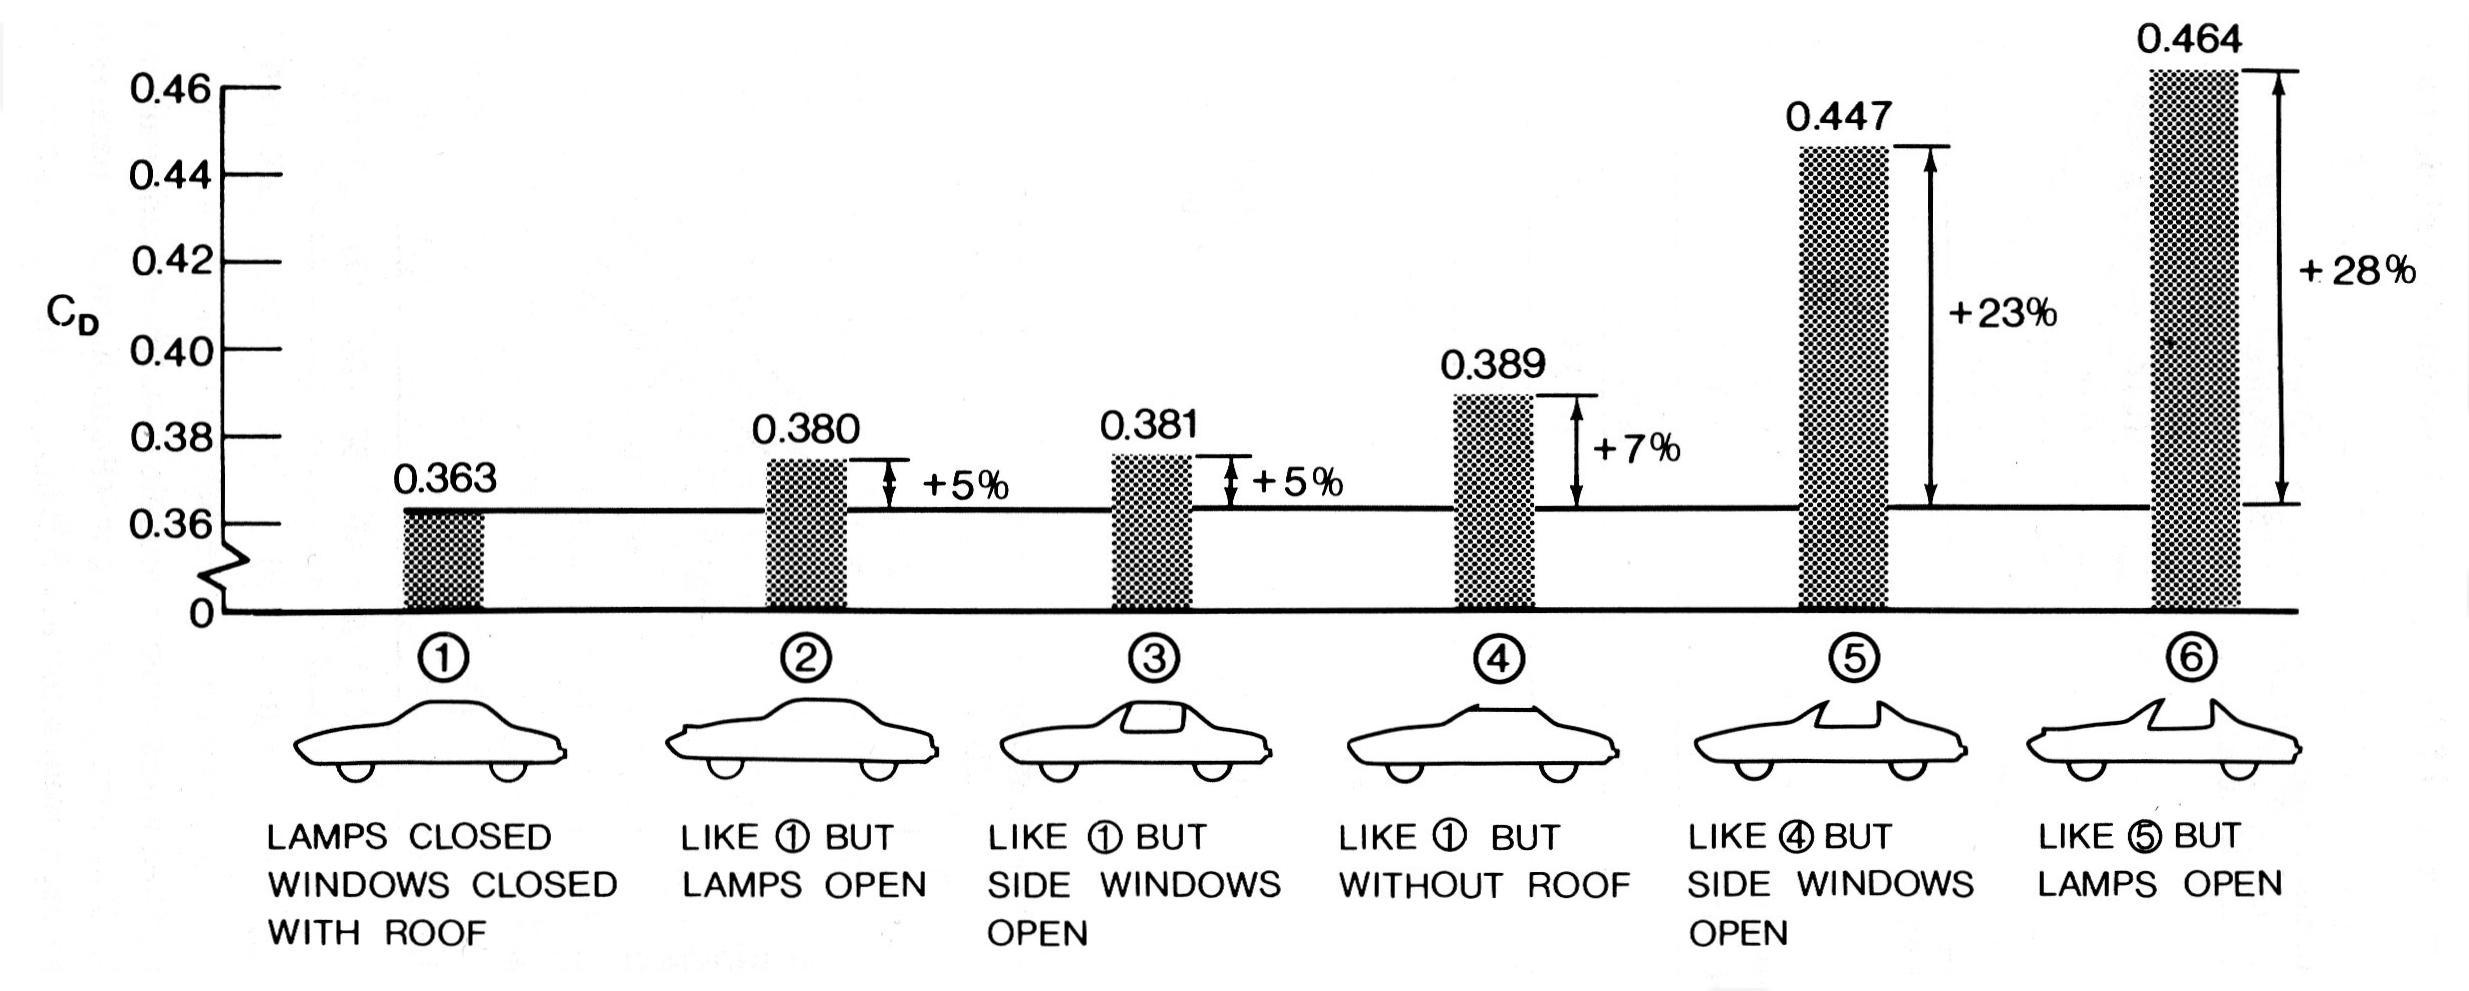
C(d) is the drag coefficient of your car (how aerodynamic it is).  A typical pinewood derby car should be around = 0.4, but you can do better. Here is a sample of real car's C(d):
http://en.wikipedia.org/wiki/Automobile_drag_coefficient
You can see the drag coefficients on real cars. Notice that F1 cars and other high performance cars have high drag coefficients.  All those spoilers and airdams are mean to cause friction to cause imbalance of air flows to keep the car on the ground, not flying off of it, because the added power via traction far offsets any advantage of aerodynamics.  So, 0.4 is a nice average car. You can probably get much lower than that having a flat car, closer to 0.2.

A is the reference area (how big your car's cross section across the front is). An uncut block is 14.113 square centimeters.

There are two things you can control when designing you car: the C(d) and the A.  A is easier.

Adjusting "A"

Think of your car in cross sections, slicing it into slices like a sausage. Think of the thickest slice of your car. That is your A.  Thus, it is best to have your back end be the thicker part because it will hold your weights. But make it as small as possible.

Here is a big design difference.  If you are like 95% of the Dads out there, you will take a 3/8" drillbit and drill holes in the back to slide in the weights. This is not going to win the race.

Your zinc weights are surrounded by high volume/low-density pinewood.  If you can afford it, you want to carve out a pocket to fit your weights into it.  Pine is very brittle, so you will need a way to carve out a pocket. I recommend a Dremel. You can get one for about $80. Get a grinding bit. They come standard in most Dremel kits and are usually pink or white. Then carve away to make a pocket. Sand your back and side walls very thin, but make an area for your axles to go through in the bottom. So there will literally be a flat step to hammer in your axles, but the step is flat so you can stack your weights on.  Don't drill out the pocket too big. Make it big enough to fit two rows of weights. You will need to adjust the size later. You will need to rough cut your car and do the finer cuts to see how much weight you will need in the back.  A key is to not leave the air pockets empty.  Fill them with tungsten sand. If you don't have that, do it with iron filings. Don't have that? Fill it will beach sand, which isn't very dense, but it is better than air. So now you have a flat "pickup truck" in the back, where you will put a balsa top on it.  You then carve the front end to be lighter, but with an eye to have a low C(d).

I have done the math and stacking all your weights in the back so that it is superback-end loaded is more than offset by the drag. Do yourself a favor and stack the weights lower. For tungsten weights, that is just a matter of putting them into 2 rows.

Adjusting C(d)

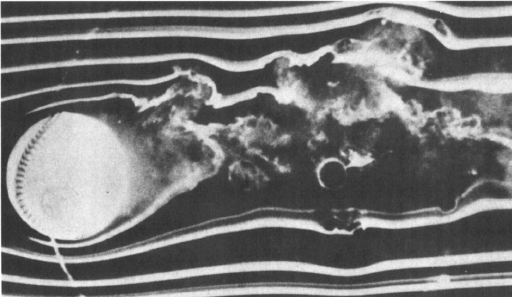
Think of all the wind tunnel tests that you have seen. A baseball has bad aerodynamics because it is round. Sure, it's better than throwing a tree branch, but it has all sorts of air distrbances coming off the back. This is what causes the baseballs to move and why there are so many different types of pitches in baseball.


Now think of a picture of car with smoke tracers. One smoke trail smashes into the front of the car and has to go around the car. The front has to be that shape because it is impractical to put a bullet cone on the front of the car. The rest of the smoke trails slip over the sleek top, but cause distrbance behind the car, which causes friction. That shape has to be there because it is impractical to have a tail cone to gently let the air slide back into place rather than just slam into the vaccuum caused by the car trunk leaving.  That's why a submarine is shaped like it is.


And forget all the cool but bumpy details like spoilers, fenders, cockpits, and flared pilons.


My son is going with a successful design that carved out a bunch of the weight in the front, leaving a giant hole in between where front axle and the back weight pocket went.  It looks cool and it is easy to execute. However, I imagine that air rides over the front, slams together in the hole again, and then has to ride over the weight pocket again.  He's going with the same design, simply because he can.  I think that is exactly what he should do because ultimately, he has to be able to build the car - not me. I only counsel him on physics and design.

I am competing in the open class for Dads.  I am building a car that reaches a sharp point in the front and then gently slopes to the back weight pocket. No steep rises or bumps to make C(d) high. And generally wedge shaped to minimize A. I am letting the air slam behind it with a flat tail-end because I have calculated that the superior center of gravity is worth it. I am removing almost all of the weight up front by carving out the middle, leaving a lattice of cross bars for support, but otherwise hollow. I am then adding a balsa nose cone and a thin balsa top. I will have a mimimum C(d) and minimum A that still allows me to have my center of gravity slightly in front of my rear axle.

Tuesday, February 11, 2014

Center of Gravity

Center of Gravity:  Have your engine (gravity) power your car for longer

Previous lessons: Density
Things needed for this lesson: raw egg, a ruler and some small coins
Concepts in this lesson: Galileo's theory of gravity, inertia, center of gravity
Time: 30 minutes

Parents: First thing you will do is look at your Pack's website or google some images of past events.  Look at the shape of the track you are using.  Parents, not engineers, buy these tracks. Almost all of the time, the ramps start off steep and then flatten out at the end.  But I have seen online one time when someone had a straight-line ramp - one that just goes in a straight line and never changes angles to the finish line, then this point is irrelevant to this lesson as all cars will accelerate the same.  This lesson only matters when the ramp curves near the bottom.


"Let's say you have two ball that are the exactly same size and outer covering material.  One weighs 5 ounces and one weighs twice as much - 10 ounces.   Let say you drop those two ball at exactly the same time off a building.  Which falls faster?

With the same air resistance or no air resistance, they fall at the same time.
Here's a great Mythbusters clip to watch to reinforce this physics lesson:
http://www.youtube.com/watch?v=7eTw35ZD1Ig

Inertia

If gravity is pulling harder on things that have more mass, why do things fall at the same speed that have different masses?  The answer is inertia. Inertia is another force. It is force that keeps something at the same speed.  Think of riding a bike.  It takes more energy to start pedalling because the bike and you on it have mass and that mass is not moving yet.  Inertia is a force keeping you at your current speed, which is zero. Once you get the bike moving, it takes a lot less effort to keep moving.  If you stop pedalling, you will keep coasting.  And now it takes effort to stop.  Bike brakes are pretty good at stopping you. But imagine how much effort you would need if you didn't have brakes and could only put your feet down to stop. Yikes!

(Take out the raw egg. Do nothing to it)
The egg doesn't want to move, so it takes effort to move it.

(Spin it on a smooth table surface. Tap the top quickly so it comes to a stop. And then watch as the egg then starts spinning again).
The egg white and yolk inside wants to keep spinning. That's inertia.

Inertia works in the opposite way of gravity and is also related to mass. So gravity pulls harder on heavier things. But inertia means that heavier things are harder to get going.  Gravity and inertia are both related to mass in the same way*.  Gravity still works, but things drop at the same speed.


A big difference: center of gravity 

You are probably thinking, "Hey, all our cars are going down the same track.  They should all "fall" down the track at the same speed, regardless of weight."

That is totally correct.

We roll our Pinewood Derby cars down ramps. Ramps converts the direct downward pull of gravity into downward AND forward energy. So the car travels a longer distance and goes slower than just dropping them, but all cars should go the same speed if they are dropped at the same time, have the same center of gravity, and have the same resistance from friction.

The very important thing to remember is that things fall at the same speed *IF* they had the same center of gravity and *IF* resistance from friction is the same.

Think of three Pinewood Derby cars of equal weight - 5 ounces - with exactly the same aerodynamics and friction.
One car is heavier in front.
One is heavier in back.
One is balanced.

Which one will go faster?
Answer: one one that is heavy in back

Why?
If you put a one ounce block on a scale and drop both at the same time, what will the scale read?
The answer is zero.  The block has mass, but no weight because gravity has converted all of the mass's weight into motion.

If you lower something slower than the speed of falling, some of gravity's force is converted into motion and some of it is converted into weight.  A scale and block in an elevator going down will say that the block weighs less than an ounce. A scale and the block on the ground will say one ounce because the scale is not moving and all of the force of gravity is converted into weight.

We design where the five ounces of mass in a Pinewood Derby goes, so that gravity will affect the mass into motion longer than other cars.

When Pinewood Derby cars of equal friction go down a ramp, they will all go the same speed because gravity accelerates them the same.   But there is a point where the track is flat.  Just before that the steep part reaches the flat part.  At that point, the front wheels are on the flat part and the back wheels are still on the downward curve. The front mass has nowhere left to go down, so its mass is converted 100% into weight.  In the back, gravity can still convert the mass into motion because there is still downhill ramp for it to move down.  So the more mass that is in the back, the longer gravity will pull your car down the ramp. And gravity's speed is not linear (you don't move at the same speed down the track), it is exponential. So a fraction of a second of gravity turning into motion is a lot as that is when the car is at its fastest.

So there is that moment at the bottom of the ramp curve where the cars reach the bottom of the ramp and then move completely onto the flat second. These are 7 inch cars. The commercial aluminum tracks are typically 42-49 feet long in length, where cars are travelling at about 160 inches per second. The whole car will pass that transition point in about 0.05 seconds.

There is something called the center of gravity. It is where half of the weight is on one side and half of the weight of something is on the other. You can do it with a ruler. A ruler with nothing on it will have its center of gravity in the middle. But as you put coins on one side, the center of gravity where you can balance it on one finger moves toward the coins.

You want your center of gravity as far back as possible, but not in front of the back axle.

This means two crucial things for design:
#1. Move your back axles grooves backward to the maximum 5/8".
#2. Do not make your car shorter than 7".  The front of the car is leaned against a starting gate. But you want you rear, where all the mass is, as high as possible so it can fall for a longer time period.


Look at the following videos on Youtube.  Watch the cars come down the ramps.  According to the law of gravity, the cars will "fall" down the ramp at the same speed *if* their aerodynamics and friction are the same.  However, we know that aerodynamics and friction are not equal, so some cars are slowed down by more friction. So the first car to the curve (the car with less friction and better aerodynamics) should win, right? Wrong.

Look at the following video and turn down the volume:
http://www.youtube.com/watch?v=tC5qRw7QhLA

The first race has all four cars racing at very similar speeds down the ramp. The two cars in the middle ramp are in a slight lead because they have less friction.  But the race changes when they hit the curve at the bottom.  At that point, the two outer cars go faster and pass the two inner cars.

The second race is dominated by a single car, so it's not a good example.

The third race at 0.47 seconds into the video is a good example. We see two outer lanes' cars that have less friction than the middle two. They are very close to each other. But watch the outer two when they hit the curve. The one in the far right lane suddenly appears to really pull away at the curve.

The fourth heat at 1:10 is not a clear example as all four cars keep the same place down the ramp and after the curve.

The fifth heat at 1:20 is a good example.  Three cars racing, two in the left are very tightly matched down the ramp but the one in the far left lane has the lead, which it then loses at the curve (but still pulls it out).

The sixth heat at 1:30 is also not a good example as there is no change of leads. The last place car probably wasn't helped by having zinc weights glued all along the top rather than clustered as tightly as possible in the back.

The seven race at 2:20 has a non-spec car that wins in a head-to-head, so it is not that much help.

The eight race at  2:52 is a second place bracket run-off.  These cars are very very evenly matched down the ramp. It is so close that any observation might be subject to point-of-view and camera quality error. However, my view is that the the car on the far right appears to be slightly less than the other two cars. The longer in the left lane seems to gain a tiny speed advantage in the curve (but then loses it).

The ninth race at 3:07 is pretty close, but again the curve is where the faster car separates. You can see two putty marks in the back of the winning car and only one in the back of the losing one. The winning car appears to have its weight farther back.

The tenth race at 3:20 is my favorite example.  Focus on the third and last place cars down the ramp.  The car in the second from the left lane is close, but still in last place coming down the ramp because he has more friction that the other cars. At the curve, the two on the right separate like they had an afterburner (they did; it's called gravity). The last place car - despite having more friction - passes the third place car in the course of about three feet.

The 11th race at 5:23 is not a good example.

But in five races, the center of gravity effect at the curve seemed to be a major impact on determining the winner and the eighth race it's debatable, so let's call it a half.  So in 5.5/11 races, center of gravity was a noticeable effect. Again, you can see how small the difference is, but how much of a difference it makes in who wins.

The last thing to note is that, if you are using tungsten weights, it is possible to put the weight too far back. Do not have your center of gravity too close to your back axle. With a popsicle stick or a ruler, you can see where you car will balance. If it is next to the axle holes, you will have to move some weight forward. If you put your weight too far back, the car loses stability and will rattle back and forth. This will translate downward speed into side-to-side energy and slow you down.


Next up: Aerodynamics


Monday, February 10, 2014

Weight: What? Are you dense?

WEIGHT and DENSITY


Current topics: density
Prior topic: Chemistry, mass, weight, gravity
Time of lesson: 20-30 minutes
Things you should have before starting this lesson:

A scale
Your lego hydrogen and oxygen "atoms"
2 plastic bags you get for produce at the grocery store, one filled with water and tied closed. The other filled with air and tied off.
I also use four drinking glasses, one nearly full of water, one with a tablespoon of baking soda, one with two table spoons of vinegar, and one empty one.
A tea candle
A lighter
The weights you are going to use in your Pinewood Derby car.  If it is lead, put it in a plastic bag.
A few things that are roughly the same size as your weights, but of lighter density.

Density

We already learned about mass, which is how much stuff is in something.  But they take up different amount of volume. What weighs more, a one-pound hammer or a one-pound bag of feathers?

It is a trick question.  They have the same weight.

Weight is a measure of mass. So both the hammer and the bag of feathers weigh the same.  The mass can come in different sizes. The one pound bag of feathers would take up a lot more space (volume) compared to the hammer.

The measure of how much something weighs based upon a unit of volume is called "density".

(Take out the glass of water and the empty glass).  Here is a glass of water.  Here is another glass.  It is not empty.  It is full of air.  Air has mass and weighs something. Which weighs more? Water or air?

Water weighs more in the same sized glass.  So water has a higher density.  So using sizes, the water weighs 829 times more than air*.  That is why air bubbles rise in water. The earth's gravity is pulling down on the heavier water more than the lighter air.

(Now is the time when you take out the tea candle, light it and put it at the bottom of one glass.)
This candle is burning. It needs air* to keep burning.

(Then pour the vinegar into the glass with the baking soda.)

These fizzing bubbles is carbon dioxide gas. Carbon dioxide is clear just like air.  It is also one and a half times as dense as air.

(Carefully and slowly pour the carbon dioxide gas out of the glass directly over the lit candle. This is kind of overkill on this topic, but but kids LOVE this trick and this will keep this lesson fun.)

The carbon dioxide is invisible but it is heavier than air and so it sinks to the bottom of this glass. The fire needs air to burn, so it goes out when the carbon dioxide covers it.  Carbon dioxide doesn't burn.

(Clear that stuff to the side. Now give the lightest thing that is roughly the same size as your weights.)

What weighs more, this (give the next heaviest thing) or this?  (Take away the lightest object and repeat until you get to your weights). Watch his amazement as he feels the density of Lead or Tungsten.

We are going to use these weights in our car. Using weights with the highest density is better than lower density.

Most kids will be using weights made out of zinc* (yes, the weights we are an alloy, but let's keep this simple).

(Show him this table:)
http://www.lenntech.com/periodic-chart-elements/density.htm

Zinc has a density of 7.13 grams per cubic centimeter.
(He will naturally want to know what is the most dense material.)
Osmium is very, very dense but it is not very much of it on earth so it is  hard to find, very expensive, and is dangerous. Actually, most of the most dense materials are really dangerous - Iridium, Uranium, Americium.

Platinum is not dangerous but Pinewood Derby weights made of platinum would cost nearly as much as a real car (U$7,000 - okay, a cheap, horrible car).   We could fill it with gold, but it costs about the same as platinum.  (Here is where if you decide if you skip over Tungsten depending on whether you are going to get it. Point to what you are using.)

Lead is about 50% heavier than Zinc.
(Tungsten is almost 3x heavier than Zinc.)

Parents' note: I did a science experiment to see what the actual effective density difference, which accounts for difference in molecules and alloys. I saw the claim on the website that sold me the tungsten weight claiming that it was 3.2x denser.  It's not true.  I weighed the zinc weights - the standard ones that almost all kids use and those hav a density of 7.43 grams/milliliter. The lead fishing weight I used was 11.4 grams/ml.  The tungsten weights were 20.4 grams/ml. So the tungsten is 2.7x denser (not 3.2x) and the lead is about 50% denser than zinc.  Using lead is a big advantage over zinc. My son has used lead in the past because it was cheap.  This year, we splurged and are using tungsten for the first time.

Next up Center of Gravity

Sunday, February 9, 2014

Gravity

Physics 1: Gravity

Time needed for this session: about 20 minutes.
Things needed: small objects of different sizes to illustrate your point, but use them only if a concept is not being understood.  Most boys are very visual, so an object often has the upside of teaching a concept better. But boys get distracted very easily, so taking an object out is a guaranteed distraction. Thus, it is best that you handle the objects and put them away and out of sight when not using them.

I used two small magnets of the same strength, two balls of different sizes, tiny "dot" stickers, and legos. I pre-sorted the legos into two colors, about two 1x1 bricks of each color, and one 4x2 bricks of three different colors, including two of the same color that you used for the 1x1s.

Parents' note: 

Let's teach our sons about physics at an age appropriate level. Let him ask questions and really understand the topic. You might have to explain the same topic, but using different examples.  In this blog, I retouch on the same topics, which to an adult is redundant. But once you do this and you see the concept sink in and the delight spread across your son's face - this will all be worth it. And later, you will have to review previous topics because he will forget the concepts; these topics are all related to each other so, this takes time.  I took the time to do this and it turned my son onto science, where he quickly went then went through the Science belt loop, Science pin, Nova, and SuperNova award.

So let's learn about gravity by learning about mass.  We will then learn about Density, which is related to mass and volume, which leads to Galileo's experiment, which involves mass and inertia, which leads to aerodynamics and friction.  This module should last about 20 minutes. Obviously, you can do more modules if your son has the patience. Or if your son is like mine, it ends up in an hour long cascade of questions where, before you know it, you discussing how autotune works or why France makes good cheese.

I will put an asterisk behind things that I know are generalizations and simplifications. We're not teaching University level stuff here. These are 6-10 year old boys who are just learning this stuff.

For your son:

Science is the study and knowledge of how things work. At school, you learn science. So you learn science to learn how and why things work.

There is a science for everything. The science of numbers and how they work together is math. The science of motion is "physics". So we are going to learn a bit about physics to learn about how motion works to make your Pinewood Derby car go faster.

Gravity

What is gravity?

You know that every time you jump, you come back down. But what is "down"? The earth is round. People on the other side of the earth also come back to earth and they are upside down compared to you.  Gravity pulls us all toward Earth. So how come we all jump in different directions and all come back toward the earth and not up and into outer space?

Force

Gravity is the "force" in nature having to do with "mass". What's force? A force is like unit of motion*. You use your muscles to generate force - like when you jump, you have upward force motion. Magnets push and pull toward each other with a specific force. You can feel that force. Some have more magnetic force than others and you can feel the strength of them as they pull and push each other. (Give magnets for a short period and then take back)

Mass

Gravity is a force in nature where all things are pulled toward each other depending on their "mass".  So what is mass? Mass is a measure of how much stuff is in something.

Basic Chemistry

(Parents' note: this may be a bit complicated for some kids, so you can skip over Chemistry section if you think your son isn't ready for this yet).

Everything is made out of basic building blocks of the universe called neutrons, protons, and electrons. Protons and electrons are literally tiny magnets. Protons have a positive charge and electrons have a negative charge. The protons and electrons pull toward each other and click together.  (Use the magnets to illustrate). The neutrons have no charge, but they often get sandwiched in between the protons and electrons. Once the protons, electrons, and neutrons click together, the magnetic forces cancel each other out and they stick together*.

Each one of these tiny sandwiches is an "atom".  (This is where I take out the legos and sticker dot to illustrate the point.)

A proton (1x1 brick of color A) has a positive charge. An electron (a sticker dot) has a negative charge. These electrons are really tiny compared to the proton*.  The proton and electron are attracted to each other and form an atom (stick the sticker on top of the brick). They are stuck to each other and it is now an atom. This is atom with one proton, one electron, and no neutrons.  It is a hydrogen atom. (Make another 1x1 brick and sticker that is identical to the first).  Here is another hydrogen atom.  This is what the sun is mostly made of.

(Take out the 2x4 bricks). Here is a group of eight protons (count the nobs on the top and/or compared to the 1x1 brick).  It gets attracted to eight electrons (hold up the stickers). But a group of eight neutrons gets sandwiched in between.  (Put the "neutron" 2x4 bricks on top of the "proton" 2x4 brick, then stick the eight stickers on top of the neutrons).  This atom is oxygen. It is a different atom than hydrogen.

So far, we have found 115 different types of these atoms*.  There is one atom with one proton, which you already know as hydrogen. There is one with two protons. There is one with three and so forth all the way up to 115*. And everything in the universe is made up of these 115 different atoms*.

Sometimes atoms interact with each other in different ways and combine to form new materials. When you combine these two hydrogen atoms with the oxygen. This is is water. This is why it is also called "H20". Two Hs. One O.

Mass is measures how much stuff is in it.  And by stuff, we mean protons, neutrons, and electrons. Protons and neutrons are about the same mass.  They are measured in atomic weight.  Look at this water molecule. See the hydrogen atom? It has one proton. The electron is so tiny compared to the proton that it has almost nothing*.  This hydrogen atom has an atomic mass of 1*.  So does the other hydrogen molecule.  It has an atomic mass of one.  The oxygen atom has eight protons and eight neutrons. (count out the protons and neutrons together).  The oxygen has an atomic mass of 16.  The 16 mass and the two single atomic masses from the hydrogen means that water molecule has an atomic mass of 18*.    


Weight


Mass is not the same as weight, but they are directly related to each other. Weight is how we measure mass, but weight depends upon where you are.  Remember how gravity is the force that pulls things together depending on how much mass there is?  (Take out the large ball and small ball).  This larger ball has more mass than this one because it has more stuff/atoms in it. You have mass and you are bigger than the ball, so you have a tiny gravitational force pulling them toward you. Now the earth is HUGE compared to us, so it has a gravitational pull that is really big. That is why we get pulled toward it no matter if we are jumping on this side of the planet or the opposite side.


You weigh something on Earth, but you weigh about one-sixth as much on the moon because the moon is made of less stuff.  The moon has less mass than the Earth so you get attracted to it less. Meanwhile, Jupiter has a lot more mass, so it would weigh more on Jupiter because its gravity is so much stronger.

Let's have some fun calculating how much you weigh on other planets in our solar system.
http://www.exploratorium.edu/ronh/weight/


We are doing the Pinewood Derby on earth, so we will be using different materials. We will use wood body, steel axles, plastic wheels, a tiny bit of paint, and weights made of  (insert weight type here).

Your Pinewood Derby car (if your rules are standard) can only weigh up to 5 ounces total.  And since we will remain on planet earth, it will remain 5 ounces.

This is very important thing about designing your car. Your car should weigh EXACTLY 5 ounces. If it is less than 5 ounces, you have a big disadvantage because gravity is the only thing  powering your car. All Pinewood cars will be 5 ounces, so having less is a very big disadvantage.

Parents: Have an accurate scale or bring it to the post office if you don't have a scale. I bought a very accurate scale and I use it in the kitchen all the time.

In the next two lessons we will talk about how having less weight is a disadvantage.

Next up: Weight

Saturday, February 8, 2014

Budgets: from champagne taste to beer budget

Let think about budgets.  You can probably get away with borrowing everything from a friend as the necessary tools are not exotic. But then there are things that you can get which are a bit more exoctic, up to buying all the stuff online.

Don't buy this stuff yet, just know what you *might* need and so you know what you're in for. I rate them from 10 to 1, with 10 being the biggest help in speed and reduced risk of screwing up your project and helping you along. So a clamp isn't going to make your car faster, but it will reduce the risk of you messing something up and it is very handy. 


I then rate them from 10-1 terms of price (10 is cheap/1 is expensive). 10 is something can be found for free.  9 is less than a dollar. 8 is less than 3 dollars. 7 is less than $5. 5 is less than 20 dollars. and 7 is less than 50 dollars. 
So 3/10 is slightly helpful, but very cheap. 

Fast car basics

BSA car kit (10/3). 
Coping saw (10/8). Get one with a removable blade. 
Sandpaper, in increasing grit rating. I recommend 80/120/150/200/600/as high as you can find it (10/7)
Hammer (10/8)
Drill (10/5)
Cotton string (3/9). Must be pure cotton. 
Scissors (1/9)
Small magnifying glass (8/7). I use a small one from a toy science kit that is the size of a jewelers loop. 
Flathead screwdriver (8/8). You use this to pry up axles, NOT pliers. Pliers bend your axle heads and are tough to repair when damaged. 
Paint (2/7). Cheap acrylic paint. Any color. Use gloss. 
Car polish (2/10). Turtle Wax. You should have one can, which is a lifetime supply  
Graphite lubricant (10/6). Specialty hobby stores. But you NEED this. 
Lead fishing weight (8/8). Get the ones that are big and shaped as barrel like as possible. 
Ruler (1/10)
Sand (9/10). Finer the sand, the better. 
Metal polish (9/10).
Pencils
A metal nail file (10/8)

Drill hint:
The whole above kit without the drill and hammer is probably less than US$50. Drills run the range and you should be able to borrow one.  Here is something not so obvious.  Don't borrow a super awesome drill.  They are frankly too powerful for this job.  You actually need a low powered one. Don't buy a low powered one on purpose, but use a cordless one. 


Serious Dad Upgrades
Clamp (8/6)
Dremel + Barrel stone bit (10/6)
#44 Drill bit (8/8)
Metal ruler (upgrade to ruler)
Small vice grip (8/5)
Popsicle sticks (2/10)
Thin balsa wood board (3/8)
A protractor (8/8)
A wooden work board.  I use an Ikea step ladder, which I use to clamp on my vice grip, paint and do my work on.  I had it, so it was free, but having a work area is very helpful. (8/5)
A small wooden board & 4 nails (2/7)
Marbles (1/8)
Rubbing alcohol (2/8)
A truly flat board (like a new book shelf board from Ikea) (10/7)
A fingernail polishing block (2/7)
A fine metal file (2/6)
Without the Dremel, this costs about US$50 more. 

In It To Win It Upgrades

Tungsten cubes (10/5)
Tungsten powder (2/5)
Other stuff you buy from Pinewood Derby equipment sites (10/3)
This stuff works and it is really helpful, but this will start adding costs in $40 increments. 

I started off cheap and now I've got a lot more stuff.  The one big splurge I did was a Dremel, but I had a bunch of the stuff I already had. My son won 2nd in the Pack without us buying anything special apart from the Dremel.  This year, we bought Tungsten weights, a drill jig, tungsten sand, hub shaver, and wheel tread shaver  this year, so we should - in theory go even faster. But just read the basics because it should make you go really fast.

Once you have gone through physics and designs, THEN you want to buy the stuff because you don't need all of this stuff and your car design will depend upon which concepts you want to incorporate. 

Concepts: my approach to building a fast car

Here are the concepts for you, the parent.  My concept is to teach the boys about science.  This then bridges into what makes a good car design and why it is designed that way. We then bridge into how to plan. We then learn about the tools and how to use them. We then practice with the tools and get better at them. And then we test the car. We spend a lot of time in this. This is teaching plan, where you get a fast car at the end and even work on qualifications for awards and rank requirements/electives.

I have laid this out in a teaching plan, each about 15-30 minutes long - which usually will be longer or shorter depending on your boy's curiosity/capabilities/patience/stamina.

Here is the key lecture that really stuck with my son the most: effort.

There will be many times where your son wants to give up/do something else, asks "does this matter?", sighs, or tries to do minimal effort. It's who they are and is naturally for that age. You have to be their cheerleader.

Remember what his goal is. Is it to "learn and have fun", "go fast", or "win".  The first can be done just by following my lesson.  The second can also be done by following my plan and actually working hard.  The third one is the hard one. And it is the one that every kid *says* they want, but are not prepared to do.  Ambition is not equal to drive. Explain to him this:

"Every kid's car starts off exactly the same. They have the same weight, the same wheels, same axles. They go the same distance, start at the same height, started at the same time, powered only by gravity.  There is nothing you can do to your car that will make it go faster than how fast the law of gravity will make it go.  That is the maximum it can go. But there are many, many, many, many, many things that will slow down a car from going as fast as possible.  It is you - the parent and Scout's task - to remove as many of things that slow down your car as possible. The parent will do his part by planning, coaching, and teaching. The Scout will do by learning, working, and working some more.

The difference between winning a race, second, third, last, or not even finishing is only determined by what you do.  Does aerodynamic matter?  Yes. Does another round of fine sanding matter? Yes. Does waxing the coat matter? Does the kind of paint matter? Yes. Does testing it one more time when you both are tired matter?  Yes.  Most of these things matter only a tiny amount. They each only mean a few thousands of a second difference each.  But the a whole bunch of "not a lots" is what makes you win or lose."

Goals for you and him

Your son's goal

Parents: find out the rules that are specific to your Pack. They often have much in common, but important differences in terms.

Find out dimension, weight, lubrication, wheel, race format (round robin, cumulative heats, or head-to-head), and restrictions.

Our was pretty standard. Same dimensions as everyone else - stock BSA cars, no after-market special wheels/axles, no wheel shaving, no springs/bearings/washers/bushings, no wet lube, no lathes, no lightening the wheels, no outside assistance, boys should do as much of the work as possible.

The unique thing about our is that all the boys race four times. One from each of the four tracks to remove any advantages/disadvantage of any specific track. The combined time was their final score.  If you didn't finish, you got disqualified. There were awards for fastest (1-3) in each rank, best looking car, fastest three in an open category (ie, parents and sibling category with the same cars). You need to know how your race is structured so you can talk to your boy as far as what his goal is.  Make it/learn/have fun?  Make a cool car? Doesn't care?  Be fastest?

Even "don't care" is a good answer. This race is for him, not you.  But 9 times out of 10, your boy will grin and say "go fast!". Then this site is for you. Go Google something else for cool designs. That's not me. I make fast cars without cheating. But I will give you tips on fast designs.

Parents' goal

The most immediate goal that a parent needs to decide is how much you want to spend on this little project. In theory, this $6 box of wheels can stay $6. But tools, gadgets, and things will all start to add up.  You can literally spend thousands of dollars on this if you really want to, including handy things like  Read my post on costs for ideas on where I think your money is best spent.

Your other goal should be how much time do you want to spend with your son on this. Look, you love him, but you have a finite amount of time.  I literally spent dozens and dozens of hours teaching him physics before we even started on the car.  He knows why we do things I do and he is totally jazzed about science. 99% of other parents are not as insane as I am about this stuff, so pick and choose what you want to take on board. Remember, this is a commitment for him as it is for you.

If you haven't already, you should also talk about expectation setting. What happens if he doesn't work on it. What happens if you don't remind him (who's responsibility is it). Promise to be there for every step of the way that you will be his guide. Tell him you will be proud of him so long as he does his best. Tell him you will remind him without getting angry, but won't press him if he doesn't do it.

The Plan

Planning is one days' 15 minute session.

Sit down with your son and 1 plain pieces of paper, one print out of the following list, and picture printout (http://www.abc-pinewood-derby.com/images/magnum-front-big.jpg), and a pencil.

Lesson:  How to make a plan and write one down 

Kids are eager little puppies, but they have yet to learn how to plan something.  When they wipe the table, they have too much water in the sponge, wipe in random shapes, wipe the same area a few times, and miss others. The can mimic the motion, but do not understand theory or technique or much/any practice.  

They have not yet learned to plan a complex long-term problem - to plan, identify their personal goal/end product, to set a time schedule, and then identify the steps to get the project done.  In this case, he won't know where to start, so you have to spell it out for him.  This is their first time probably.

Here are the steps you will have printed on one piece of paper. Draw an arrow going from the top to the bottom so that the goals. Use an analogy that the boy will understand. How about a pizza analogy since all kids love pizza and generally know how its made.  If you want to make a pizza, how do you make a plan? They will spit out some elements to a pizza - cheese, dough, ovens, their favorite topics. But that's about it.


What is your goal? (Have a pizza). Do you know how to make a pizza (some of it, but probably should learn about the important steps). When would you eat the pizza? Do you have all the stuff you need to make the pizza? (no). What kind of pizza are you making? How big? What ingredients do you need in order to make that kind? Where would you buy the ingredients? How would you get to the store? How much would that cost? Who is bakiWould you be okay with your parents showing you some extra tips to make your pizza extra yummy, crispy, and nice looking?

1. Set Goals*
2. Concepts: ideas about Pinewood Derby cars, the science behind it, and our personal
3. Physics: learning fun stuff about how things work
4. Supplies: what do we need to do to make a car and what does dad need?
5. Prepping the wood
6. Cutting new axles holes/groove
7. Rough cut: The first cut
8. Weight pocket: Putting the weight in the right place
9. Second cut: Removing bad weight
10. Fine cuts: making it look like a car
11.Sanding: making your car smooth
12. Axle/wheel prep: making your car fast
13. Weighting your car
14. Painting
15. Polishing
16. Testing
17. Lubricating
18. Finish Car
19. Race day prep
20. Goal: race a car that we are proud of because we learned new stuff, did our best, and completed it on time*

This is the order you will do from when you start until the day of racing. Give this paper to your son so he can use it as a checklist and tape it to his room wall.

Next take the printout picture of a car, so that you and your son can learn the same language so your son/you don't get frustrated with communication issues. This is so it isn't "you know, the thing, the end part, no the other part".


Label the following things:
Front
Bottom
Back
Top
Pilon (the part of the wood where the wheel is mounted)
Weight pocket (not pictured, but this is where you will drill out to fit your weight in)


Wheels (the wheel has multipled parts)
Wheel hub (the little well where the nail head rests in)
Wheel tread (actually there is no tread, but this is the flat part where it rolls)
Wheel bore (the hole inside of the wheel where the axle goes)
Wheel cone (the part of the wheel that will be next to the body of the car)


Axles (the nail that mounts the wheels)
Axle head (the nail head)
Axle shaft (the long part)

The third piece of paper is so your son can write down any ideas he has as you go through this.

Next session: Goals

Don't forget to be a parent

Give me a moment to be preachy. Let's not forget about what Cub Scouting is all about and some of the guiding principles that I follow.

I call Cub Scouts the "Don't Forget to Be a Parent Club", where you pass along some information to your son, you experience things together, and you learn something yourself. It is also a time to live up to the things that you say to your son are important: honor, learning, discipline, hard work.

I say this not to be self-righteous, but more to describe my perspective. I'm not about win-baby-win. This is to give you the tools that I wish that I had when I was doing Pinewood Derby. This may not be for you, or you don't agree with my views.  That's for you to decide to take with you. Really, it's about tools to help you out and make your son happier and smarter.  That's a good thing, right?  But ultimately, when I followed these rules, we learned, we did it together, and we nearly won the whole thing. So, these techniques work.

Honor

Pinewood Derby is not about winning. If your pack is like ours - it is now 170 boys strong - the chances of them winning it is pretty low. So this may be one of the first times that your son can fail - and fail safely with minor consequences.  Yes, egos will be bruised. It will hurt and there is a decent chance he'll cry, but here comes a great moment in parenting. So here comes a moment for sportsmanship in staying positive and congratulating the boys that do well, learning about how to handle "losing", and keeping true to the motto "do your best".  And if you're like me, there is nothing like a huge, a person acknowledgement of pride, and an ice-cream wouldn't solve.

The top thing about Pinewood is that this is the boy's project, not the father's.  So let them take an age-appropriate amount of responsibility in making their car. One of the more interesting things is, as the Scouts go from Tigers to Wolf to Bear to Webelos, the cars get *worse*. Let's be realistic. Kids today are wonderfully more advanced at art, reading, technology, and science that us parents (or the people who designed the Cub Scout requirement trail) ever were as kids. How many times did you laugh at requirements that today are quite quaint and anachronistic like "eat food that is not American", "read a whole book without moving your lips then get a major award", "whittle a hickory halltree that will hold your bowler and trundling hoop". Seriously. Let your boy do as much work as he can.

Tigers - depending on the boy - may not understand a single concept. Some start to really grasp the basics.
Wolfs understand the basics, but generally lack any stamina, dexterity, attention span or  to do anything for more than 15 minutes.  They get frustrated easily and need lots and lots of patience.
Bears take a big leap forward. They generally understand complex concepts and can work on projects for more than 20 minutes without getting tired. Depending on their motivation, you can really be just the teach/mentor/guide and they do all the work with your hand gently on top guiding them.
Webelos.  Again, you are the guide/mentor/cheerleader - they do everything.

Learning

I covered so many topics with my son that it was as involved some serious physics. My son isn't dumb, he's just never experienced physics or did in school superficially. So I spent the time on weekends going over dozens of physics lessons that taught him some amazing things. Sure, let's keep it age appropriate and you may  have to go over the same topics over and over again, but let's not under-estimate what they can learn. I probably spent 40 plus hours talking to him. He ask a question about something. We'd go off on a tangent. We ended up doing fun lesson about surface tension, viscosity, speed of light, refraction/reflection, humidity, cellular biology, and  And it's a pleasure to teach him.

Discipline

You do the planning, teaching, cheerleading, encouraging, rewarding, prepping, cleaning, buying, and guiding. Tell them you will help them every step of the way, but they will do their cars. I tell my son that if he doesn't do the work, it will remain a block of wood. No yelling, no screaming, no getting angry. I will remind him all the time, but no stern thoughts. Every boy knows that this is THE biggest event of the Scouting year, so no consequences need to be meted out if his car remains a block of wood.

Your kids probably get fed a steady stream of wake up now, eat this now, time to go to school, do your homework.  This may be the first time that your boy has a big block of time that will need many, many days to complete - especially since 6-10 year old boys have short attention spans. So they (and you) will need the discipline to get this done in 15 minute segments - give or take some time dependent on your kid's patience. I taped a calendar to my son's wall. He writes down the days he goes to the library (and is responsible for those things), and deadlines and benchmark times we want to be finished by.  If it's February and you say the race is in April - it is too distant. For a lot of boys, it might as well be billion years. Having them count, cross off, and designate days is invaluable in terms of getting used to the concept of "long term" planning. He gets it now. And that is how I will write this blog - in 15-30 minute blocks that you can do with your son(s).

Hard work

Sanding sucks. It's boring. And it is a bit dangerous. There even may be blisters and cuts. But at the end of this, they will have something that will look good and they will be immensely proud of. No need to lecture him about this.  Every kid displays their car proudly in their room after they are done.

Pinewood Derby Time - 2014

Pinewood Derby - you're here because your son is doing it, which means YOU are doing it.  No worries.  Let me pass along some of my experience to make it easier, more fun, and more successful.

Why am I doing this? 

My son and I had a lot of fun doing it. He also learned a lot of new science concepts.  And I am sure will remember it as a positive experience for the rest of his life. As a Pack leader, I want that for all the kids.  Last year, my son came in second place for a whole pack that was over 150 kids big. His car was fast. Very fast. And it came in second over four races by 0.007 seconds combined for a 49' track.   Let that sink in a bit.  That is, on average, the width of a pencil (I did the math). My son (and I) took the second place in the right way - it's a great honor and not "losing". It was doing awesome and it was the perfect place to come in because he is motivated to try super hard this year.

This blog is my experience. It gets technical and has a lot of science. I only took high school physics, so I am not a scientist in any way. But I've put some thought - and an awful lot of effort - into being a good father.

First, take a deep breath.

Then, read the Principles section, then read about Planning, then look at Physics, before you start on Execution. Execution - the cutting, sanding, drilling and stuff comes last.  Enjoy!