Tuesday, June 24, 2014

Rough Cut - Give 'em a coping saw


Rough Cuts


Previous lessons: 
All the theoretical stuff

Things you’ll need for this lesson:

Printed blank templates from here. This is a template without the wheels super-imposed on the car. Print it at “actual size” so it is the right size. If you can’t make it work, you just trace the outline of the block onto a piece of paper.  Check to see that the templates are scaled correctly (ie, they match the block).

Ruler
Sharp pencils
A coping saw with that has a mouth that is bigger than 3.5 inches
(or a small-toothed plywood saw)
A vice clamp (recommended)
Shims to protect the wood from the clamp (eg, small plywood squares)
WD40
A pack of extra blades if you are using a coping saw
A pencil sharpener
Popsicles 

Lesson:
There are really three things that will be learned, two for the son and one for the Dad. For the Dad, the lesson will be patience. This is the time for your son to try, fail, and then try again. This will be a day of failures, so you might even need to take a popsicle break or two, talk over things during the break, and maybe even start again another day if frustration gets too high.

The lessons for the sons will be accuracy. For some, your son will have been coddled – everything they do is great. Sure, this is great encouragement so that they stay motivated, but the Pinewood Derby is often one of the first experiences that good effort does not necessarily equal good results.

The third lesson will be technique. Today, your son will be cutting his block. Most of us do not have access to a bandsaw. And even if we did have a bandsaw, I would not use it. A bandsaw is obviously too dangerous for the boys to use. And if you work the bandsaw for your son, then they never learn how to saw.  This is the day your son learns how to saw correctly.

Have your son take a piece of paper. Give him some choices of designs, which will be a) wedge, b) plank, or c) something that will look cool, but will be slower.  

Give him the template, show him how each side corresponds to a side of the block.

On the side profiles of the template, have him mark a dot that is on the “front” and ½ inch from the bottom. Then have him mark a dot that is on the “back” and ½” from the bottom. The “back” is the side where the pre-cut axle groove is nearer to the back on the block.  Have him do it for both sides.  Have him connect the front and back lines.

Is the dot exactly at ½ inch? Is the line straight? Probably not. 

Start again and show him how mistakes are a natural part of this process. Now you do this practice. Show him how to hold the ruler straight and firmly against the paper so it does not slide. Show him why you need a SHARP pencil to make an accurate mark. Show him how you have to angle the pencil tip inward toward the ruler so that the mark is next to the ruler, not a bit away from the ruler. Show him that if YOU make a mistake, you correct it or you start over without it being a big deal that you failed.

Once the template has two straight lines on it, have him cut them out and tape them to the block. Have him over-trace the straight lines onto the car by pressing firmly so that the wood is marked underneath. Have him connect the two lines on the front and back with a pencil.

Now clamp the wood block into a vice using shims to protect the wood. I used popsicle sticks that were taped together to make a flat mat. I used popsicle sticks because that’s what I had lying around.

You should saw a small groove on either the “front” just to start your son off. Then have him start sawing. Show him good technique, which is to move his arm back and forth in deliberate strokes, where the arm is tucked in close to his side, elbow going straight back so that the saw goes straight. He won’t be able to do it very well. As he saws, he will get off course. The saw will bind because he won’t keep his arm straight. He will break/bend blades. This is okay as there is room for error. Get him back on course. He will get tired. Don’t forget to keep checking both sides so you don’t get too far off track.  When the blade binds a bunch, spray some WD40 on the sides of the saw. And you can put a firm hand on top of his to guide him and to make sure that he presses down on the saw as often they are going the motion, but don’t have the strength to actually saw. This will try your patience and his, but keep up the good work.


Phew!

Thursday, February 27, 2014

Friction

Friction:


Previous lesson:


Gravity
Center of Gravity

Things you'll need for this lesson:

(Optional) Materials of different roughness (jeans, silk, wood, & sandpaper of different grit). The pinewood derby kit with wheels, nails, and body.


Lesson

Sir Isaac Newton lived in a later time than Galileo, but he is credited with really isolating the theories of motion.

His first law of motion is something that is in motion will continue to do so unless affected by an outside force. In outer-space, there is no air. For the most part, there is absolutely nothing in space. So there is nothing to slow down a rocket ship.  So in outer-space, a rocket ship could blast off then turn off its engines and then travel forever in one direction at the same speed; that is, until it came close enough to something else to be affected by it, like gravity or friction.

What is friction?


Friction is a force. It is the force of resistance between two different materials sliding against each other. Let's say you want to go down a slide really fast.

You climb to the top of a giant playground slide that has four slides of exactly the same height and shape and steepness. One is made of cement and one is made of shiny steel.

Which one is going to be the fastest to slide down?

The steel one, of course.

And you have a choice of trousers that you can slide on.  You can wear your trousers made of sticky tape or jean? Which one would you wear to go faster? Jeans.

Certain materials slide easier.  They have lower "friction quotient". This friction quotient is a number that measures how easily things slide against another.

How does friction affect the Pinewood Derby car?

There are several things that can affect friction, but the biggest thing that causes friction in a Pinewood Derby is a material's roughness as it rubs against something else.

The car doesn't just run down the track, it is a bunch of different thing rubbing against each other. It is the wheels rolling on the track, the inside of the wheels rubbing against the axle pins, the wheels bouncing back and forth on the axle and with the outer wheel hub rubbing against the inside of the axle hub and the inside wheel cone rubbing against the car body, and the car pushing/rubbing against the air as it falls down the track.

So your Cub Scout is going to polish all of the surfaces that are places where things rub - the axle shaft/inside, wheel inside/outer-hub/tread/inner-hub, and the outer skin of the car (where air rubs against it).

Roughness = friction
It is easy to understand why a steel slides have less friction than a cement slide because the difference in roughness is obvious.  In the case of Pinewood Derby, every scout is given identical wood, nails, and wheels. So it is not a matter of having materials that have less friction, but how you treat the materials to have less friction.  

Here is an example, the axle right out of the box has a ring shanks (those line ridges in the middle of the shaft) and burr (that webbing of metal in between the head and the shaft. The ring shanks are purposely put on there so a nail won't come out once nail it.  Both obviously have to be removed (and I will talk about that more later). Scratches, dents, and bumps that you can see are big sources of friction.


Look at the side of the nail besides the ring shanks.  It looks smooth, right?

Yes, it is smooth, but it can be made smoother.  If you looked at the nail shaft under a microscope, you would see a bumpy surface with micro-cracks, small holes, and tiny bumps. These cracks, bumps, and holes slow your car down too.


And the same thing happens with wood. Your block of wood looks like it has straight edges. But under a microscope, we see it has rough edges, each ridge acting like a rough surface to rub against you wheel hubs or catching the wind. These need to be sanded down.


Other forms of friction

And the car just doesn't glide down the track. It jiggles, crashes side to side, and rolls over really small unseen stuff in the track. This bumping about causes even more friction as downward energy motion is lost into other motions - side to side, up and down (with the down like pressing harder on the brakes).  The general rule is, the quieter the car, the less friction. 

What friction matters the most on a Pinewood Derby car?

In this order, this is what you should spend the most time on in terms of polishing.

Axles sides
Vibrational friction
Axle hubs
Inner wheel
Wood side
Air
Wheel surface

How do we reduce friction

We cannot eliminate all friction, but we try to remove as much friction as possible.  We will sand different parts of our car many different times, each time with a sandpaper with smaller and smaller rocks on it until the rocks are so small that we can't see them.


Monday, February 17, 2014

Risk

There is one element that nobody really talks about when designing and building a real pinewood derby car: risk.

You can design a great car. Your son can try to hammer in the axles straight. Your son is going to do his best in making the car. But things go wrong. They go wrong when you do it. They go wrong when he does it.

Tips:
1. Do yourself this favor.  If nothing else - buy 2 or 3 sets of the car kit.  A bent axle, a miscut body, a broken wheel, a mismeasured line will ruin this for your son. Do not let having another $6 block of wood, four other steel nails, and some cheap plastic wheel be the difference between disaster and good times.

2. Drilling axle holes versus axle grooves. And there are some issus with risk in design. The most imminent one is drilling holes farther back and higher up. In theory, it will make your car faster.  In practice, you are introducing a lot of new risk into the design. Without a drill press or a specialty drill jig attachment, you have no chance of drilling new holes straight enough to make the car go straight (and win). It is easier to cut a straight line with a coping saw for an axle groove. So just be prepared to make mistakes.

One year, we drilled holes. They weren't straight. So we used the other side of the block. They weren't straight either. We cut axle grooves on one side. One wasn't straight, so we used the other side.  I decided to only make one cut and keep the existing axle groove.  I got that line straight. And the axle groove allowed me to move the axles up and down, which was an added bonus. So, yes, axle grooves are not theoretically as good a drilled holes, but in practice, they are a lot, lot easier to work with.

3. One block, two bodies. You should be able to make your rough cut, one quarter in on the thin side angling up to one inch in the back. You cut that, you have two car bodies to work with. You mess up on one, you have another to work on.

4. Get a coping saw that is more than 3.5 inches in clearance in the back.  Otherwise, you will have difficulty cutting the block in half.

5. Safety first. Get goggles that fit you and your son.  Have an eye wash station ready to go.  There is sharp things, metal burrs, sawdust, and other things you don't want in your eyes. Have a pair of light gloves for you.  Your son is not going to be steady with the coping saw and Dremel.  It WILL get away from him now and again.  It is better that the thin gloves take the brunt of it rather than your skin. And your son won't cry because  he hurt you on accident.

6. Do NOT wait until the last minute to start.  I have said this before. You can do the car in one day. Your son will need months.  Things happen. Homework. Holidays. Birthday parties. Pinewood gets deprioritized and don't expect it to be a priority. Just allow for lots of time.

7. If the rules say 3/4 inch clearance, add on an extra 1/16 of an inch. The biggest tears come from kids who bottom out on a track and can't finish a race. And I have yet to see it, but disqualification has to be horrible. Let's try to win, but let's not flirt with disaster.

8.  Be prepared for race day adjustments/disasters. I will have a post on this later.


Rotational Inertia

There is something rarely talked about.

Rotational inertia.  Take a ball and quickly twist/rotate it in your hand. Now take a ruler and rotate/flap it back and forth. The ball's mass is compact, so rotates easily.  The ruler's is long and has its mass distributed along its entire length. The end of the rulers are far away from where you are rotating your wrist, so it takes more effort to stop and reverse direction.  This is rotational inertia.

The same thing happens in your pinewood derby car.  Most tracks slide down and then quickly curve at the bottom.  Those that have their weight distributed along the car nose to back will have more inertia, taking more effort to go into the curve. Those with weights that are compact aligned will navigate the curve with less rotational inertia.

If you want your son to win, he will not be using zinc weights. But if he is, drill your holes close together and go into the side of the car, not the back. I encourage lead or tungsten weights, which are already very dense by putting them together in the weight pocket.  They will be naturally aligned along the back in tight rows. Rotational inertail issue minimized.

Aerodynamics

Aerodynamics

Previous lessons: Center of gravity

This section is divided into two sections. One for parents and one for the kids.

Parents:
Drag is the friction caused by the air the Pinewood Derby cars travel through.  It is the following calculation:


{\mathbf  {F}}_{d}={1 \over 2}\rho AC_{d}v^{2}=bv^{2}

F(d) is the air drag in newtons (how much this slows down your car measured in kg m/second(squared)
rho (that little p) is the density of air (1.1644 kg/cubic meter, give or take depending on temperature and humidity)
v is the relative velocity of the object (the cars on our track travelled at about 4.0 meters/second)
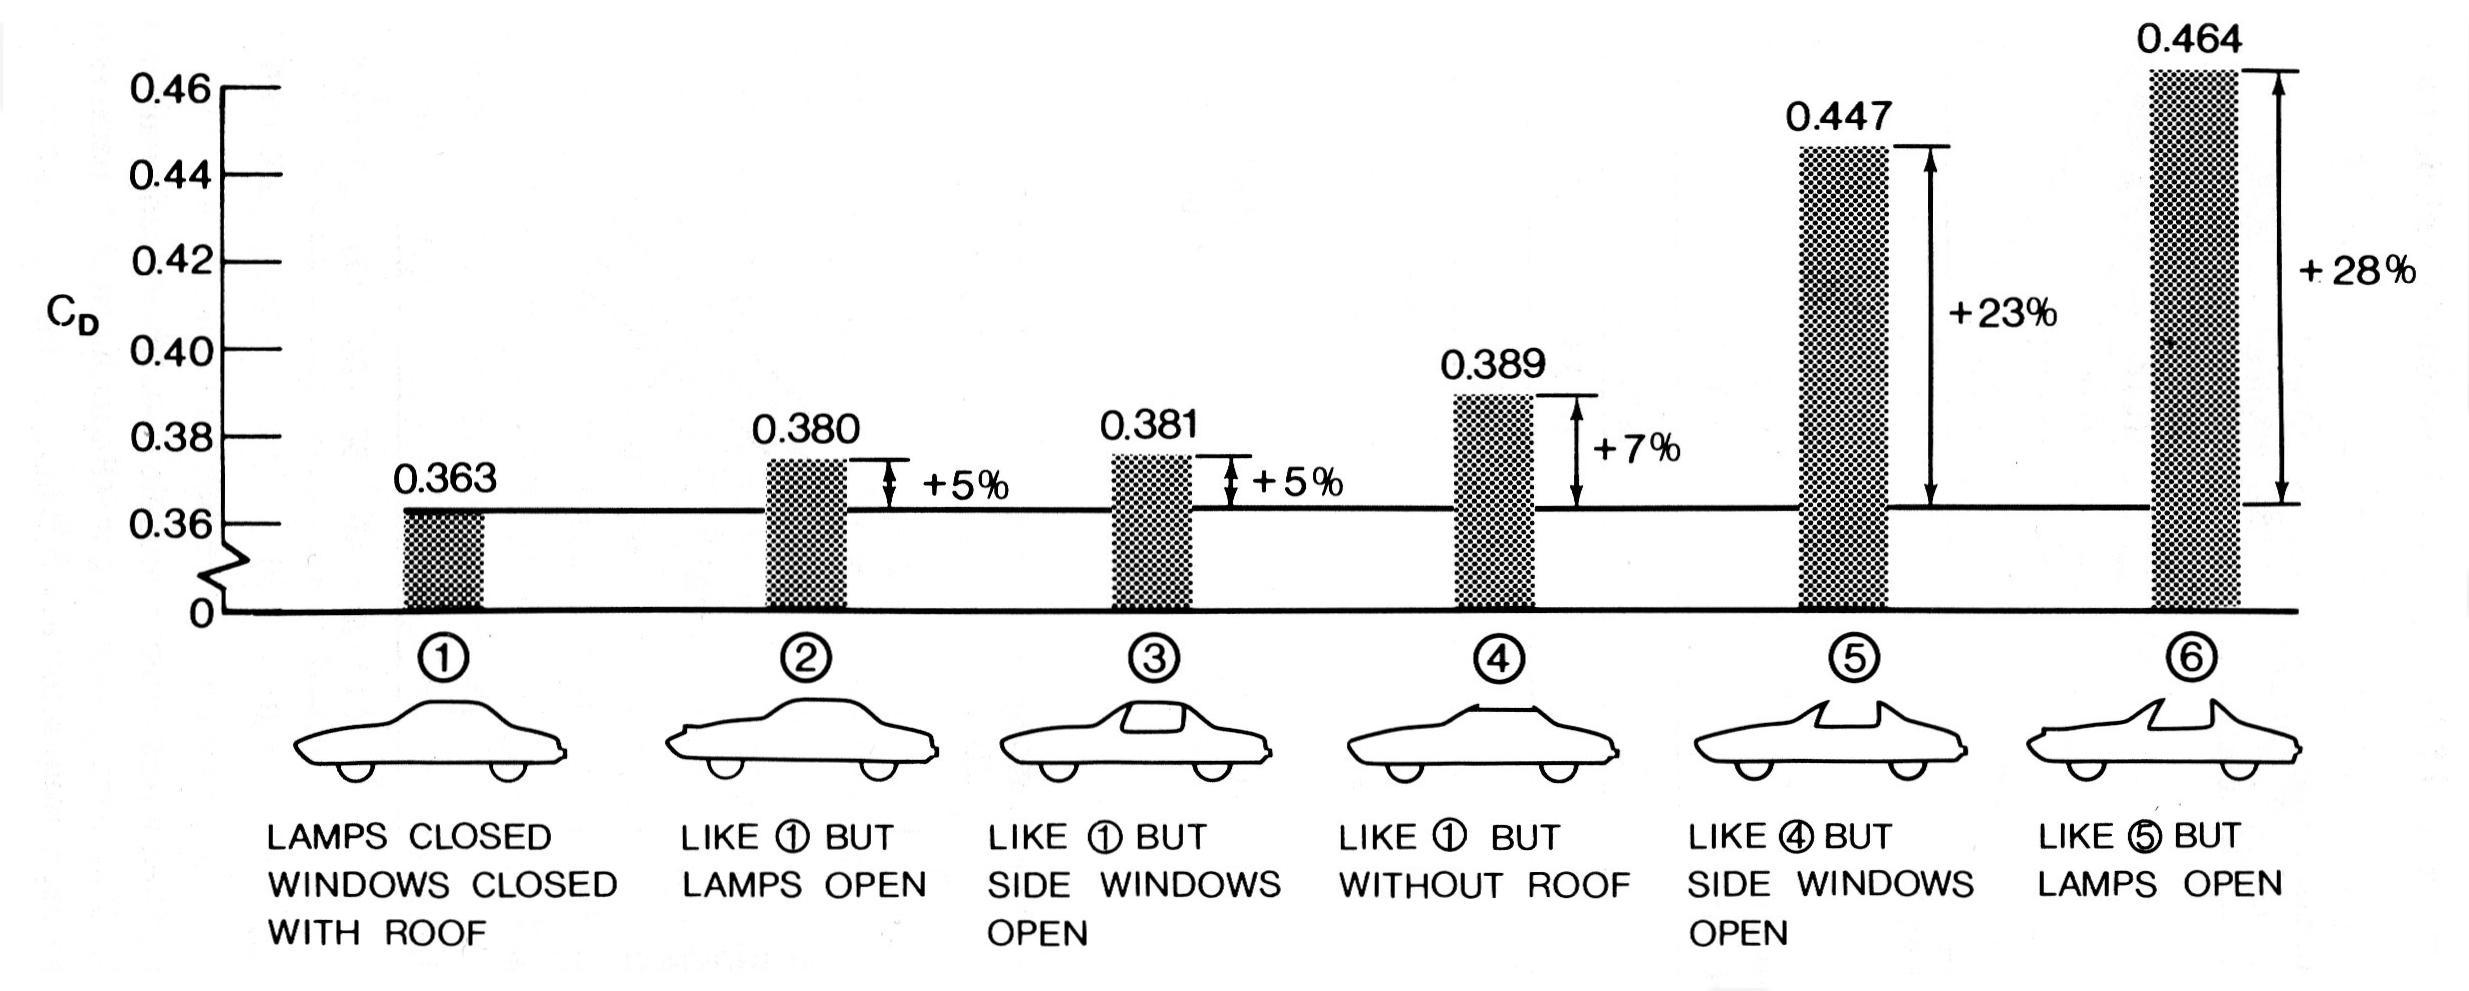
C(d) is the drag coefficient of your car (how aerodynamic it is).  A typical pinewood derby car should be around = 0.4, but you can do better. Here is a sample of real car's C(d):
http://en.wikipedia.org/wiki/Automobile_drag_coefficient
You can see the drag coefficients on real cars. Notice that F1 cars and other high performance cars have high drag coefficients.  All those spoilers and airdams are mean to cause friction to cause imbalance of air flows to keep the car on the ground, not flying off of it, because the added power via traction far offsets any advantage of aerodynamics.  So, 0.4 is a nice average car. You can probably get much lower than that having a flat car, closer to 0.2.

A is the reference area (how big your car's cross section across the front is). An uncut block is 14.113 square centimeters.

There are two things you can control when designing you car: the C(d) and the A.  A is easier.

Adjusting "A"

Think of your car in cross sections, slicing it into slices like a sausage. Think of the thickest slice of your car. That is your A.  Thus, it is best to have your back end be the thicker part because it will hold your weights. But make it as small as possible.

Here is a big design difference.  If you are like 95% of the Dads out there, you will take a 3/8" drillbit and drill holes in the back to slide in the weights. This is not going to win the race.

Your zinc weights are surrounded by high volume/low-density pinewood.  If you can afford it, you want to carve out a pocket to fit your weights into it.  Pine is very brittle, so you will need a way to carve out a pocket. I recommend a Dremel. You can get one for about $80. Get a grinding bit. They come standard in most Dremel kits and are usually pink or white. Then carve away to make a pocket. Sand your back and side walls very thin, but make an area for your axles to go through in the bottom. So there will literally be a flat step to hammer in your axles, but the step is flat so you can stack your weights on.  Don't drill out the pocket too big. Make it big enough to fit two rows of weights. You will need to adjust the size later. You will need to rough cut your car and do the finer cuts to see how much weight you will need in the back.  A key is to not leave the air pockets empty.  Fill them with tungsten sand. If you don't have that, do it with iron filings. Don't have that? Fill it will beach sand, which isn't very dense, but it is better than air. So now you have a flat "pickup truck" in the back, where you will put a balsa top on it.  You then carve the front end to be lighter, but with an eye to have a low C(d).

I have done the math and stacking all your weights in the back so that it is superback-end loaded is more than offset by the drag. Do yourself a favor and stack the weights lower. For tungsten weights, that is just a matter of putting them into 2 rows.

Adjusting C(d)

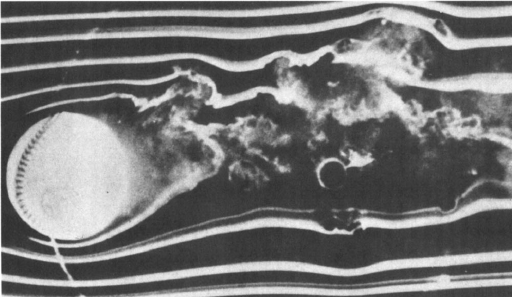
Think of all the wind tunnel tests that you have seen. A baseball has bad aerodynamics because it is round. Sure, it's better than throwing a tree branch, but it has all sorts of air distrbances coming off the back. This is what causes the baseballs to move and why there are so many different types of pitches in baseball.


Now think of a picture of car with smoke tracers. One smoke trail smashes into the front of the car and has to go around the car. The front has to be that shape because it is impractical to put a bullet cone on the front of the car. The rest of the smoke trails slip over the sleek top, but cause distrbance behind the car, which causes friction. That shape has to be there because it is impractical to have a tail cone to gently let the air slide back into place rather than just slam into the vaccuum caused by the car trunk leaving.  That's why a submarine is shaped like it is.


And forget all the cool but bumpy details like spoilers, fenders, cockpits, and flared pilons.


My son is going with a successful design that carved out a bunch of the weight in the front, leaving a giant hole in between where front axle and the back weight pocket went.  It looks cool and it is easy to execute. However, I imagine that air rides over the front, slams together in the hole again, and then has to ride over the weight pocket again.  He's going with the same design, simply because he can.  I think that is exactly what he should do because ultimately, he has to be able to build the car - not me. I only counsel him on physics and design.

I am competing in the open class for Dads.  I am building a car that reaches a sharp point in the front and then gently slopes to the back weight pocket. No steep rises or bumps to make C(d) high. And generally wedge shaped to minimize A. I am letting the air slam behind it with a flat tail-end because I have calculated that the superior center of gravity is worth it. I am removing almost all of the weight up front by carving out the middle, leaving a lattice of cross bars for support, but otherwise hollow. I am then adding a balsa nose cone and a thin balsa top. I will have a mimimum C(d) and minimum A that still allows me to have my center of gravity slightly in front of my rear axle.

Tuesday, February 11, 2014

Center of Gravity

Center of Gravity:  Have your engine (gravity) power your car for longer

Previous lessons: Density
Things needed for this lesson: raw egg, a ruler and some small coins
Concepts in this lesson: Galileo's theory of gravity, inertia, center of gravity
Time: 30 minutes

Parents: First thing you will do is look at your Pack's website or google some images of past events.  Look at the shape of the track you are using.  Parents, not engineers, buy these tracks. Almost all of the time, the ramps start off steep and then flatten out at the end.  But I have seen online one time when someone had a straight-line ramp - one that just goes in a straight line and never changes angles to the finish line, then this point is irrelevant to this lesson as all cars will accelerate the same.  This lesson only matters when the ramp curves near the bottom.


"Let's say you have two ball that are the exactly same size and outer covering material.  One weighs 5 ounces and one weighs twice as much - 10 ounces.   Let say you drop those two ball at exactly the same time off a building.  Which falls faster?

With the same air resistance or no air resistance, they fall at the same time.
Here's a great Mythbusters clip to watch to reinforce this physics lesson:
http://www.youtube.com/watch?v=7eTw35ZD1Ig

Inertia

If gravity is pulling harder on things that have more mass, why do things fall at the same speed that have different masses?  The answer is inertia. Inertia is another force. It is force that keeps something at the same speed.  Think of riding a bike.  It takes more energy to start pedalling because the bike and you on it have mass and that mass is not moving yet.  Inertia is a force keeping you at your current speed, which is zero. Once you get the bike moving, it takes a lot less effort to keep moving.  If you stop pedalling, you will keep coasting.  And now it takes effort to stop.  Bike brakes are pretty good at stopping you. But imagine how much effort you would need if you didn't have brakes and could only put your feet down to stop. Yikes!

(Take out the raw egg. Do nothing to it)
The egg doesn't want to move, so it takes effort to move it.

(Spin it on a smooth table surface. Tap the top quickly so it comes to a stop. And then watch as the egg then starts spinning again).
The egg white and yolk inside wants to keep spinning. That's inertia.

Inertia works in the opposite way of gravity and is also related to mass. So gravity pulls harder on heavier things. But inertia means that heavier things are harder to get going.  Gravity and inertia are both related to mass in the same way*.  Gravity still works, but things drop at the same speed.


A big difference: center of gravity 

You are probably thinking, "Hey, all our cars are going down the same track.  They should all "fall" down the track at the same speed, regardless of weight."

That is totally correct.

We roll our Pinewood Derby cars down ramps. Ramps converts the direct downward pull of gravity into downward AND forward energy. So the car travels a longer distance and goes slower than just dropping them, but all cars should go the same speed if they are dropped at the same time, have the same center of gravity, and have the same resistance from friction.

The very important thing to remember is that things fall at the same speed *IF* they had the same center of gravity and *IF* resistance from friction is the same.

Think of three Pinewood Derby cars of equal weight - 5 ounces - with exactly the same aerodynamics and friction.
One car is heavier in front.
One is heavier in back.
One is balanced.

Which one will go faster?
Answer: one one that is heavy in back

Why?
If you put a one ounce block on a scale and drop both at the same time, what will the scale read?
The answer is zero.  The block has mass, but no weight because gravity has converted all of the mass's weight into motion.

If you lower something slower than the speed of falling, some of gravity's force is converted into motion and some of it is converted into weight.  A scale and block in an elevator going down will say that the block weighs less than an ounce. A scale and the block on the ground will say one ounce because the scale is not moving and all of the force of gravity is converted into weight.

We design where the five ounces of mass in a Pinewood Derby goes, so that gravity will affect the mass into motion longer than other cars.

When Pinewood Derby cars of equal friction go down a ramp, they will all go the same speed because gravity accelerates them the same.   But there is a point where the track is flat.  Just before that the steep part reaches the flat part.  At that point, the front wheels are on the flat part and the back wheels are still on the downward curve. The front mass has nowhere left to go down, so its mass is converted 100% into weight.  In the back, gravity can still convert the mass into motion because there is still downhill ramp for it to move down.  So the more mass that is in the back, the longer gravity will pull your car down the ramp. And gravity's speed is not linear (you don't move at the same speed down the track), it is exponential. So a fraction of a second of gravity turning into motion is a lot as that is when the car is at its fastest.

So there is that moment at the bottom of the ramp curve where the cars reach the bottom of the ramp and then move completely onto the flat second. These are 7 inch cars. The commercial aluminum tracks are typically 42-49 feet long in length, where cars are travelling at about 160 inches per second. The whole car will pass that transition point in about 0.05 seconds.

There is something called the center of gravity. It is where half of the weight is on one side and half of the weight of something is on the other. You can do it with a ruler. A ruler with nothing on it will have its center of gravity in the middle. But as you put coins on one side, the center of gravity where you can balance it on one finger moves toward the coins.

You want your center of gravity as far back as possible, but not in front of the back axle.

This means two crucial things for design:
#1. Move your back axles grooves backward to the maximum 5/8".
#2. Do not make your car shorter than 7".  The front of the car is leaned against a starting gate. But you want you rear, where all the mass is, as high as possible so it can fall for a longer time period.


Look at the following videos on Youtube.  Watch the cars come down the ramps.  According to the law of gravity, the cars will "fall" down the ramp at the same speed *if* their aerodynamics and friction are the same.  However, we know that aerodynamics and friction are not equal, so some cars are slowed down by more friction. So the first car to the curve (the car with less friction and better aerodynamics) should win, right? Wrong.

Look at the following video and turn down the volume:
http://www.youtube.com/watch?v=tC5qRw7QhLA

The first race has all four cars racing at very similar speeds down the ramp. The two cars in the middle ramp are in a slight lead because they have less friction.  But the race changes when they hit the curve at the bottom.  At that point, the two outer cars go faster and pass the two inner cars.

The second race is dominated by a single car, so it's not a good example.

The third race at 0.47 seconds into the video is a good example. We see two outer lanes' cars that have less friction than the middle two. They are very close to each other. But watch the outer two when they hit the curve. The one in the far right lane suddenly appears to really pull away at the curve.

The fourth heat at 1:10 is not a clear example as all four cars keep the same place down the ramp and after the curve.

The fifth heat at 1:20 is a good example.  Three cars racing, two in the left are very tightly matched down the ramp but the one in the far left lane has the lead, which it then loses at the curve (but still pulls it out).

The sixth heat at 1:30 is also not a good example as there is no change of leads. The last place car probably wasn't helped by having zinc weights glued all along the top rather than clustered as tightly as possible in the back.

The seven race at 2:20 has a non-spec car that wins in a head-to-head, so it is not that much help.

The eight race at  2:52 is a second place bracket run-off.  These cars are very very evenly matched down the ramp. It is so close that any observation might be subject to point-of-view and camera quality error. However, my view is that the the car on the far right appears to be slightly less than the other two cars. The longer in the left lane seems to gain a tiny speed advantage in the curve (but then loses it).

The ninth race at 3:07 is pretty close, but again the curve is where the faster car separates. You can see two putty marks in the back of the winning car and only one in the back of the losing one. The winning car appears to have its weight farther back.

The tenth race at 3:20 is my favorite example.  Focus on the third and last place cars down the ramp.  The car in the second from the left lane is close, but still in last place coming down the ramp because he has more friction that the other cars. At the curve, the two on the right separate like they had an afterburner (they did; it's called gravity). The last place car - despite having more friction - passes the third place car in the course of about three feet.

The 11th race at 5:23 is not a good example.

But in five races, the center of gravity effect at the curve seemed to be a major impact on determining the winner and the eighth race it's debatable, so let's call it a half.  So in 5.5/11 races, center of gravity was a noticeable effect. Again, you can see how small the difference is, but how much of a difference it makes in who wins.

The last thing to note is that, if you are using tungsten weights, it is possible to put the weight too far back. Do not have your center of gravity too close to your back axle. With a popsicle stick or a ruler, you can see where you car will balance. If it is next to the axle holes, you will have to move some weight forward. If you put your weight too far back, the car loses stability and will rattle back and forth. This will translate downward speed into side-to-side energy and slow you down.


Next up: Aerodynamics


Monday, February 10, 2014

Weight: What? Are you dense?

WEIGHT and DENSITY


Current topics: density
Prior topic: Chemistry, mass, weight, gravity
Time of lesson: 20-30 minutes
Things you should have before starting this lesson:

A scale
Your lego hydrogen and oxygen "atoms"
2 plastic bags you get for produce at the grocery store, one filled with water and tied closed. The other filled with air and tied off.
I also use four drinking glasses, one nearly full of water, one with a tablespoon of baking soda, one with two table spoons of vinegar, and one empty one.
A tea candle
A lighter
The weights you are going to use in your Pinewood Derby car.  If it is lead, put it in a plastic bag.
A few things that are roughly the same size as your weights, but of lighter density.

Density

We already learned about mass, which is how much stuff is in something.  But they take up different amount of volume. What weighs more, a one-pound hammer or a one-pound bag of feathers?

It is a trick question.  They have the same weight.

Weight is a measure of mass. So both the hammer and the bag of feathers weigh the same.  The mass can come in different sizes. The one pound bag of feathers would take up a lot more space (volume) compared to the hammer.

The measure of how much something weighs based upon a unit of volume is called "density".

(Take out the glass of water and the empty glass).  Here is a glass of water.  Here is another glass.  It is not empty.  It is full of air.  Air has mass and weighs something. Which weighs more? Water or air?

Water weighs more in the same sized glass.  So water has a higher density.  So using sizes, the water weighs 829 times more than air*.  That is why air bubbles rise in water. The earth's gravity is pulling down on the heavier water more than the lighter air.

(Now is the time when you take out the tea candle, light it and put it at the bottom of one glass.)
This candle is burning. It needs air* to keep burning.

(Then pour the vinegar into the glass with the baking soda.)

These fizzing bubbles is carbon dioxide gas. Carbon dioxide is clear just like air.  It is also one and a half times as dense as air.

(Carefully and slowly pour the carbon dioxide gas out of the glass directly over the lit candle. This is kind of overkill on this topic, but but kids LOVE this trick and this will keep this lesson fun.)

The carbon dioxide is invisible but it is heavier than air and so it sinks to the bottom of this glass. The fire needs air to burn, so it goes out when the carbon dioxide covers it.  Carbon dioxide doesn't burn.

(Clear that stuff to the side. Now give the lightest thing that is roughly the same size as your weights.)

What weighs more, this (give the next heaviest thing) or this?  (Take away the lightest object and repeat until you get to your weights). Watch his amazement as he feels the density of Lead or Tungsten.

We are going to use these weights in our car. Using weights with the highest density is better than lower density.

Most kids will be using weights made out of zinc* (yes, the weights we are an alloy, but let's keep this simple).

(Show him this table:)
http://www.lenntech.com/periodic-chart-elements/density.htm

Zinc has a density of 7.13 grams per cubic centimeter.
(He will naturally want to know what is the most dense material.)
Osmium is very, very dense but it is not very much of it on earth so it is  hard to find, very expensive, and is dangerous. Actually, most of the most dense materials are really dangerous - Iridium, Uranium, Americium.

Platinum is not dangerous but Pinewood Derby weights made of platinum would cost nearly as much as a real car (U$7,000 - okay, a cheap, horrible car).   We could fill it with gold, but it costs about the same as platinum.  (Here is where if you decide if you skip over Tungsten depending on whether you are going to get it. Point to what you are using.)

Lead is about 50% heavier than Zinc.
(Tungsten is almost 3x heavier than Zinc.)

Parents' note: I did a science experiment to see what the actual effective density difference, which accounts for difference in molecules and alloys. I saw the claim on the website that sold me the tungsten weight claiming that it was 3.2x denser.  It's not true.  I weighed the zinc weights - the standard ones that almost all kids use and those hav a density of 7.43 grams/milliliter. The lead fishing weight I used was 11.4 grams/ml.  The tungsten weights were 20.4 grams/ml. So the tungsten is 2.7x denser (not 3.2x) and the lead is about 50% denser than zinc.  Using lead is a big advantage over zinc. My son has used lead in the past because it was cheap.  This year, we splurged and are using tungsten for the first time.

Next up Center of Gravity